The Checker Maven
The World's Most Widely Read Checkers and Draughts Publication
Bob Newell, Editor-in-Chief
Published every Saturday morning in Honolulu, Hawai`i
Noticing missing images? An explanation is here.
So This is Checkers?
(This article was rewritten on 09 February 2005 due to newly found information affecting its accuracy.)
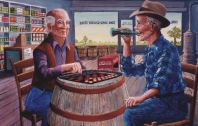
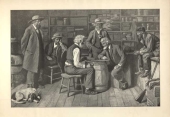
Take a good look at the image below. It's an artist's conception of a serious checker game in a rural grocery store. Nice drawing, but the artist was clearly not a checker player.
However, the game these two are playing in fact could be one of two (or maybe even more, but we know of two) little-known checker variants, one of them quite old and the other quite modern. The game also looks a lot like (but isn't quite) several other unusual variants.
Do you know what variants would be an exact match? Can you name a few also-rans that don't quite make it?
Click on the picture to see a larger version; then come back and click on Read More for the solution.
[Read More]Position Beats Possession
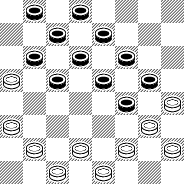
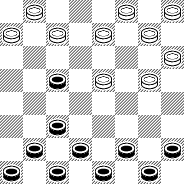
The title of this problem is a saying of Tom Wiswell's, and when you find (or see) the solution, you'll understand the wisdom of it. The position arose in a handicap game that Mr. Wiswell played something like 50 years ago.
You might find this one a little difficult unless you're used to solving a certain type of problem (but if I told you what type I might be giving away too much). Good luck! When you've solved it, click here for an animated solution.
Carol Joy Cole: A Friend to the Checkers World
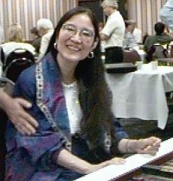
These have been fine items, though the "swirly" checkers are not strictly regulation, and the Danish checkers are a bit on the thin side. Now, Carol has improved her offerings by obtaining Roger Blaine's special order stock of genuine solid color Crisloid red and whites, in both 1.25 and 1.50 inch diameter sizes.
I splurged on both of these sets, and they are wonderful. The color and manufacture is uniform and the "feel" of the pieces is great. These are true regulation checkers, and an excellent value at $20 for the small and $30 for the large, plus $4 for shipping. Get them while they last!
You can reach Carol through her web site, as linked above, or by email at cjc@tir.com.
Checker Hall of Fame to Close as Walker Resigns Positions

On January 11, Mississippi newspapers published this article about Walker's January 7 arrest and indictment on Federal money laundering charges. The charges are tied to a series of companies operated by Walker, including the International Checkers Hall of Fame.
Prominent checker personalities and officials have been quick to point out the outstanding contributions made over a period of decades by Mr. Walker to the game of checkers. He has been a tireless promoter and organizer and has worked hard on behalf of the checker-playing community.
The charges against Mr. Walker are serious indeed. But let's not forget that in America, a man is innocent until proven guilty. Mr. Walker deserves fair consideration and a fair trial. And no matter the outcome, his record of service to the checker world will always stand.
February 1, 2005 update: additional news stories can be found here.
Coffee and Cake

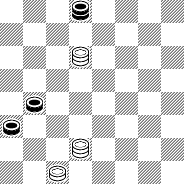
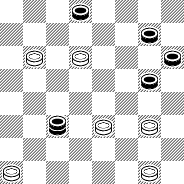
"This problem has been dubbed by experts the champion 'coffee and cake' problem. This means that you can set this problem up for your friends and bet them coffee and cake that they cannot win it."
I bet Brian Hinkle coffee and cake, and not surprisingly, I now owe him! But can you win it? Give it a good try and then treat yourself to coffee and cake no matter the outcome.
You can view an animated solution here. Did you win coffee and cake?
A January Warmup
In many parts of the Northern Hemisphere, January is a cold month, and so a warmup might be just the thing! Here is a simple problem to get you started with this month's Checker Maven challenges--- but beware, they all won't be this easy!
Brian Hinkle sent us this run-up from the Double Corner opening:
| 9-14 | 23-18 |
| 14x23 | 27x18 |
| 12-16 | 22-17---A |
| 16-19 | 24x15 |
| 10x19 | 31-27?---B |
A---A defense from Teschelheit's Master Play of the Checkerboard, unfortunately unsound.
B---Loses at once, although White is probably already lost. One alternative line of play from the KingsRow computer engine is this: 26-23 19x26 30x23 11-15 18x11 8x15 32-27 5-9 31-26 4-8 25-22 8-11 23-18 15-19 27-23 11-16 17-13 7-11 29-25 1-5 22-17 3-8 17-14 8-12 25-22 11-15 18x11 9x27 Black Wins.
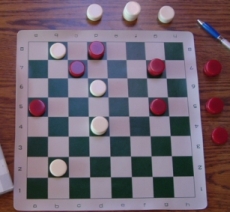
After 31-27, the following position arises:
How quickly can you solve this one? Click on Read More for the solution - but give it a good try first.![]()
News From the CSi BBS
First, Martin Fierz has released a new version of CheckerBoard (click on the link to download). This release fixes and adds a few things, but mostly allows use of Hans L'Hoest's OCA database, a very large collection of checker games.
Checkerboard is surely one of the premiere checker interfaces available. We all owe Martin, big time, for developing, maintaining, and enhancing this fine software.
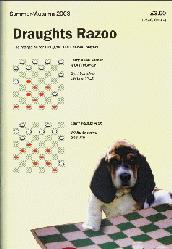
Second, Draughts Razoo, which to my knowledge is the only full-fledged checker print magazine (there are several newsletters), is discontinuing publication. The editor, Nick McBride, simply doesn't have the time any longer for such a major undertaking. 'Tis a pity. The days of my grandfather were filled with checker magazines and newspaper columns. Is there a single one left? Comment here if you know of any, for the benefit of us all.
Al Lyman, noted commentator, correspondence player, and checker educator, has proposed a monthly on-line magazine. This would be a "complete" magazine going well beyond an episodical blog such as The Checker Maven. Al is certainly well-qualified to do this and I wish him success. It's a lot of work; don't I know it! Keeping up The Checker Maven is effort enough, but a full monthly magazine will require concerted effort and a lot of help. I hope it works out and enriches the checker world thereby.
Review of Blondie24

It doesn't come close to world-class results in Blondie24 either, despite the authors claim of expert-level play (although it doesn't do that badly either). However, though neural network programming is interesting and different, that isn't at all what makes this program unique. I won't spoil it for you here; just use as a clue the fact that the game is subtitled "Checkers With An Attitude."
Take a look at the review, check out the Digenetics web site, and see what you think. Then, for an objective look, check out this animated game between Blondie and Simple Checkers, showing surprising over-the-board play quality.
Can You Be The Third Person In The World To Solve This?
an original problem by contributing author Brian Hinkle
Only 2 players in the world have solved this 6x5 puzzle! Can you become the 3rd person to solve it?
So far only Alex Moiseyev and Jim Morrison could solve it.
On a scale of 1 to 10 (with 10 being the most difficult) Alex gave it a 7, and Jim gave it an 8.5. Both enjoyed it thoroughly.
Gerry Lopez, Leo Levitt, Carl Reno and many others have all failed to solve it - even with computer help! A number of players simply thought it was set up wrong!
The solution will be published online here in The Checker Maven on May 7, 2005.
Please send any human (no computers answers please!) solution to:
How hard is this puzzle? Cast your vote here.
February 1, 2005 update: solved by Albert Tucker! Will you be the next one to crack this toughie?
New Release of KingsRow

Drop in the Chinook 8-piece database, and I bet you don't beat this one over the board.
Go here and download your copy right away. A review of the new release will appear on my Checker Program Review Page sometime in early 2005.
The Checker Maven is produced at editorial offices in Honolulu, Hawai`i, as a completely non-commercial public service from which no profit is obtained or sought. Original material is Copyright © 2004-2025 Avi Gobbler Publishing. Other material is public domain, as attributed, or licensed under Creative Commons. Information presented on this site is offered as-is, at no cost, and bears no express or implied warranty as to accuracy or usability. You agree that you use such information entirely at your own risk. No liabilities of any kind under any legal theory whatsoever are accepted. The Checker Maven is dedicated to the memory of Mr. Bob Newell, Sr.
