The Checker Maven
The World's Most Widely Read Checkers and Draughts Publication
Bob Newell, Editor-in-Chief
Published every Saturday morning in Honolulu, Hawai`i
Noticing missing images? An explanation is here.
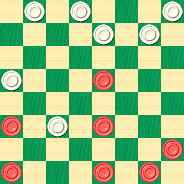
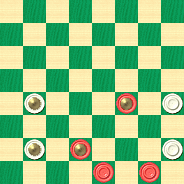
McKelvie's Jumbo Shot

When you think of a "jumbo shot" the photo above might represent one of your worst nightmares. That one looks like it's going to hurt--- a lot--- and you probably can't expect much in the way of sympathy from the old-fashioned stern-looking nurse who is preparing to administer it. Neither is it likely to be a "shot in the arm," if you know what we're getting at.
On the checkerboard, a jumbo shot could be a nightmare or a delight, depending which end of it you're on. It too could hurt the recipient a great deal while definitely being a shot in the arm to the one who delivers it. Today's excerpt from Willie Ryan's Tricks Traps & Shots of the Checkerboard features our old friend Mr. McKelvie and a shot to end them all. Willie explains, even if somewhat briefly.
"Here's another good number by Champion D. G. McKelvie on the Souter opening, in which 15 pieces are cleared from the board in one grandiose sweep. McKelvie was evidently a keen student of the stroke art, since many of the best-known coups are credited to his name.
| 11-15 | 26-22---1 | 11-15---3 |
| 23-19 | 8-11 | 30-26 |
| 9-14 | 22-17 | 8-11 |
| 22-17 | 4- 8---2 | 26-22 |
| 6- 9 | 27-23 | 3- 8. This |
| 17-13 | 15-18---A | brings you |
| 2- 6 | 32-27 | to the |
| diagram." |
A---After this, black is trapped and tied. Better play here for a draw is: 14-18, 23-14, 9-18, 17-14, 10-17, 21-14, 7-10, 14-7, 3-10, 24-20, 15-24, 28-19, 5-9*. Wm. F. Ryan.
1---A weak move; 25-22 is much better---Ed.
2---Gives up all advantage. 14-18 would have kept a strong lead---Ed.
3---Turns a probable loss into a clear one. 11-16 would have minimized the damage although there is really no saving this one---Ed.
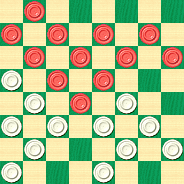
WHITE
White to Play and Win
Will you find this one to be a shot in the arm, or a pain in, you know, the other place? We won't needle you any further; take a stab at it and then press the plunger on Read More to see the solution.![]()
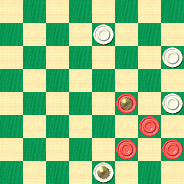
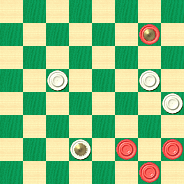
D. Robertson, Clockmaker and Checkerist?

We looked for references to "D. Robertson," to whom today's Checker School studies are credited. We didn't directly find anything about this old-time checkerist, but we did find the beautiful old-time clock replica above, appropriately titled the "D. Robertson" model. Now, checkerist Robertson hailed from Scotland in the late 1800s. The clock above is a copy of a Scottish clock that, at least by appearance, may have dated from around the same time. Could D. Robertson, checkerist, have also been D. Robertson, clockmaker? We made some inquiries, but didn't come up with any clear answers. Still, the possibility is intriguing.
Once sold by a company appropriately called Timeworks, the above clock replica is, sadly, no longer in their catalog. In fact, the era of analog clocks itself seems to be passing; we're surprised at the number of younger people today who can't read anything but a digital clock. We could continue the theme by further waxing nostalgic about the heyday of checkers, but instead we'll get back on track and present Mr. Roberton's positions.
| D. ROBERTSON | D. ROBERTSON |
| WHITE | WHITE |
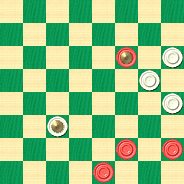 | 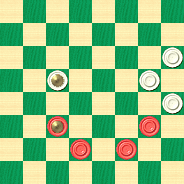 |
| BLACK | BLACK |
| Black to Play and Win | Black to Play and Win |
| B:W21,17,13,K11:BK22,6,5,2. | B:W21,K19,17,13:BK11,9,7,6. |
At first glance the positions look balanced, but White's group of three men on the left lacks mobility, and that's often a fatal flaw in checkers. Still, finding the win will require clockwork precision.
Now, this isn't a "beat the clock" speed position, so take all the time you wish before clocking your solution. Then move your hands (remember, it's an analog clock) to Read More to see the solutions, four sample games, and detailed notes.![]()
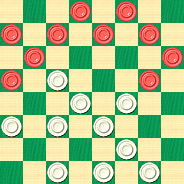
McKelvie's Masterpiece

Once again, we hope we've fooled you. With an article title containing the word "Masterpiece" you probably expected to see the Mona Lisa or some other famous work of art. However, we wanted to showcase something that not only featured the word "masterpiece" but also the name "McKelvie." Well, we didn't come up with an artist named D. McKelvie, but we did find J. McKelvie, a talented illustrator for on-line and print comics. "Li'l Depressed Boy," if you're not familiar with the series (and we certainly weren't) is a comic that started on the internet and now appears in print form. We can't say we're going to rush right out and buy it, but we can say that J. McKelvie is certainly a talented artist who produces masterpieces in their own genre.
Does J. McKelvie play checkers? We don't know, but D. McKelvie certainly did back in his day, and this month's excerpt from Willie Ryan's Tricks Traps & Shots of the Checkerboard features play attributed to the Mr. D. McKelvie, as Willie explains in somewhat taciturn fashion.
| 9-13 | 21-14 | 3- 7 |
| 21-17 | 12-16 | 20-11 |
| 5- 9 | 24-20 | 7-16 |
| 25-21 | 16-19 | 31-27 |
| 11-15 | 25-21---1 | 1- 5 |
| 29-25 | 4- 8 | 14-10 |
| 9-14 | 32-27 | 6- 9 |
| 23-18 | 8-12 | 10- 6 |
| 14-23 | 27-24 | 9-14 |
| 27-11 | 12-16 | 21-17 |
| 8-15 | 20-11 | 14-21 |
| 17-14 | 7-16 | 6- 1 |
| 10-17 | 24-20 | 5- 9---A |
WHITE
White to Play and Win
A---The loser. 16-20, 27-23, 20-24, 23-16, 24-27, 16-11, 27-31, 11-8, etc., is the correct play to draw."
1---32-27 might have been better but this line seems to equalize---Ed.
Can you create a masterpiece, or will you become a "Li'l Depressed Boy" yourself? Avoid depression by depressing your mouse on Read More to see the spectacular solution.![]()
Petterson's Drawbridge

The beautiful old drawbridge shown above is at the entrance to the walled Dutch town of Heusden, which lies on the Maas River. We think it's a fitting illustration for today's Checker School lesson, which is about the classic "Petterson's Drawbridge" position.
We always ask when we present material on a well-known position: How well do you really know it? We're certain that our more advanced readers know it pretty well, but a thorough review never hurts; and for everyone else, this is a great opportunity to master this very difficult end-game formation. Here are two examples for you to try out. You might wish to attempt the second one first.
| R.D. PETTERSON | J. BRADLEY |
| BLACK | BLACK |
 |  |
| WHITE | WHITE |
| White to Play and Draw | White to Play and Draw |
| W:W9,20,21,30:B1,3,14,19. | W:WK2,10,20,21:B1,3,K18,K19. |
When you've crossed this bridge, or more correctly, these bridges, cross your mouse over to Read More to see the solutions, four sample games, and detailed study notes. If you go over all of this material carefully, you'll be a drawbridge expert (of the checker variety, at least) and your cross-board results will definitely improve.![]()
Reed's Rocket

Given the title of today's column, we'll guess that you were expecting to see a picture of a powerful rocket blasting off from its launching pad. Instead, what you see above is an ingenious device called the Reed Rocket Nutcracker. We suppose that when you have "a tough nut to crack" this device will provide all the cracking power you'll ever need. But for cracking less resistant nuts, perhaps an old-fashioned low-tech nutcracker might do the job without the set-up time the "rocket" appears to require.
Old-time checkerist C. F. Barker was certainly a tough nut to crack, but in Willie Ryan's Tricks Traps & Shots of the Checkerboard, Willie describes just how James Reed did exactly that.
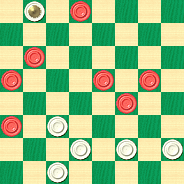
"Here is how James P. Reed, of Pittsburgh, Pennsylvania, put the skids under Boston's renowned Charles Francis Barker, in an American Championship match in 1889:
| 10-14 | 21-14 | 6-10 |
| 22-17 | 9-25 | 27-24 |
| 7-10 | 29-22 | 1- 6 |
| 17-13 | 10-14 | 19-15 |
| 3- 7 | 22-18 | 10-19 |
| 25-22 | 14-17 | 24-15---1 |
| 14-17 | 24-19 | 12-16---A. |
WHITE
White to Play and Win
W:W32,31,30,28,26,23,18,15,13:B17,16,11,8,7,6,5,4,2.
A---Fatal. 6-9 or 11-16 will draw."
1---Play has been textbook perfect to this point---Ed.
You know what we're going to say now: Can you crack this position, or will you crack up trying? Take a crack at it, and then crack that mouse on Read More to see the powerful solution.![]()
21st Century Checkers: the 9-14 "Double Corner" Ballots

Today we are pleased to present the second volume of Grandmaster Richard Pasks new work on the 3-move openings: 21st Century Checkers 9-14s, or the Double Corner ballots.
As he did with volume 1, Mr. Pask is making this work available in electronic format, free of charge.
The new book can be downloaded here, and will soon appear on our Richard Pask page as linked in the right-hand column; a large selection of Mr. Pasks other works can also be found there.
Heres a position taken from the book. The run-up to the diagram is as follows.
9-14 23-19 5-9 27-23 11-15 22-18 15-22 25-18 7-1; 26-22 11-15 18-11 8-15 24-20 15-24 28-1; 4-8 22-18 8-11 30-26 2-7

BLACK
Black to Play and Win
B:W31,29,27,26,23,21,20,19,18:B14,12,11,10,9,7,6,3,1.
What would have been the correct move? Can you show the win after 32-27? Can you work all of this out on your own?
See how far you can get, and then click on Read More to see the solutions. And, of course, dont forget to download the book! Our sincere thanks go to Mr. Pask for allowing us the privilege of presenting his new book.![]()
A Great Checker Resource: Google Books

In recent years, checker books have been hard to come by and often expensive. Publication of new checker books has slowed to a trickle; and while most if not all of the new books are very fine indeed, they are often sold in limited quantities through private sources. It all makes it difficult for the new checkerist looking for study material, the collector looking to broaden his collection, or the experienced player looking to expand his horizons even further.
The Checker Maven has reproduced a number of checker works, both old and new, in newly typeset editions; these have met with a generally enthusiastic reception. But as a small publisher there's a limit to how much we can produce, and it's never as much as we or the checker-playing public would wish.
Enter Google Books (books.google.com), which has as its goal the colossal task of digitizing the world's books, both new and old. An incredible and growing selection is available on-line, and checker books have not been neglected.
Go to the site and search for "checkers" or "draughts" and you'll see what we mean. Dozens of books are listed. While a good part of the collection just shows the book cover or a brief extract, there are numerous books listed as free Google ebooks, and these are yours for the taking. The free books tend to be older classics, but what better way to build or expand a collection of quality checker literature?
There are a few limitations. The books are PDF images and are not electronically searchable; some of the scans are imperfect, and of course they look like what they are: images of the pages of old books. But trust us, you'll want to download many of these. They can easily be printed and used in hard-copy, or simplest of all, just read on the computer.
In today's column we'd like to feature a game from one of the real finds on the site, the match book from the 1887-8 contest between Charles Barker of America and James Smith of Scotland. If you don't have this book in your collection, by all means get it for free from Google Books.
The match was won in a convincing fashion by the American champion Barker. Here is the run-up to the critical position in game four, in which Barker drew first blood.
| 1. | 12-16 | 24-20 |
| 2. | 8-12 | 28-24 |
| 3. | 3-8 | 21-17 |
| 4. | 16-19 | 24x15 |
| 5. | 10x19 | 23x16 |
| 6. | 12x19 | 17-14 |
| 7. | 9x18 | 22x15 |
| 8. | 11x18 | 26-22 |
| 9. | 7-11 | 22x15 |
| 10. | 11x18 | 20-16 |
| 11. | 8-12 | 16-11 |
| 12. | 19-24 | 27x20 |
| 13. | 6-10 | 30-26---A |
Forms diagram.
A---Definitely loses.
BLACK
Black to Play and Win
B:W32,31,29,26,25,20,11:B18,12,10,5,4,2,1.
Can you correct the losing move? Can you find the winning line of play and book the win? Or will the page turn on you? Find the answers and then click on Read More to scan the solution.![]()
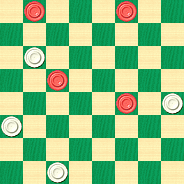
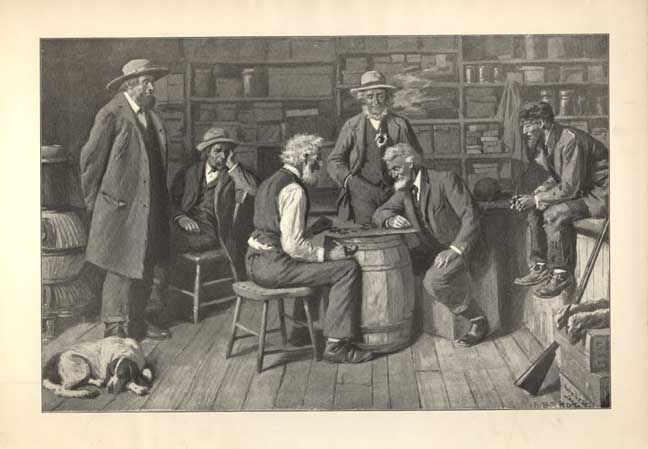
Deans, Pearson, and Quinlan: Laying Down the Law in Checkers

Deans, Pearson, and Quinlan: It sounds more like the trio of lawyers shown above than a trio of checkerists credited with thematically related studies, but checkerists they were. We really don't know whether one or more of them might have been lawyers during their time in the mid-to-late 1800s; we suppose it's possible, but we didn't come up with any further information.
We can confidently say, however, that the three positions diagrammed below are eminently practical and, as the latest entries in our Checker School series, well worth your time to master. All positions are shown with White at the top for ease in comparison.
E. DEANS
BLACK
White to Play and Draw
W:W26,21,13,K2:BK14,9,6,5.
WHITE
BLACK
Black to Play and Win
B:W19,17,13,K7:BK25,6,5,1.
WHITE

BLACK
Black to Play and Win
B:W15,13,K7:BK14,9,6,1.
These studies "lay down the law," so to speak, for endings of this type. Do your best to find the right moves--- legal moves, of course--- to make your case, then click on Read More for the definitive judgments, including sample games, detailed notes, and a supplementary problem.![]()
Frank Dunne's Shot

In our ongoing series taken from Willie Ryan's Tricks Traps & Shots of the Checkerboard, we've from time to time found new wrinkles via computer analysis, as we have with today's offering. Willie of course got it right (which happens at least 99% of the time), but there is an interesting line of play that the computer turned up and that Willie apparently didn't examine. Let's have a look as Willie describes the problem.
"The name of Frank Dunne, famed English master of five decades ago---1, holds an illustrious place in the archives of checker literature. His writings on the game were of the highest order, and he made many outstanding contributions to the silent art. Here we record the ever useful Dunne Shot which arises in play from several different openings.
| 10-15 | 24-19 | 6-9---A |
| 22-18 | 15-24 | 22-18 |
| 15-22 | 28-19 | 4-8 |
| 25-18 | 8-11 | 26-22 |
| 9-13 | 29-25 | 1-6---B. |
| 18-14 | 11-16 | See the |
| 11-15 | 25-22 | diagram. |
A---If black plays 4-8 here, then white wins quickly with this pretty touch: 14-10!, 7-14, 22-17, 13-22, 26-10, 6-24.
B---Inviting, but fatal. The correct sequence to draw is: 16-20, 30-25, 8-11, 18-15, 11-18, 22-15, 9-18, 23-14, 1-6, 31-26, 3-8, 26-23,13-17, 32-28, 20-24, 27-20, 7-10, 14-7, 2-27, 21-14, 27-31, 19-15. Wm. F. Ryan."
1---At present writing, more like 11 decades---Ed.
WHITE
White to Play and Win
W:W32,31,30,27,23,22,21,19,18,14:B16,13,12,9,8,7,6,5,3,2.
Bombard this position with your best ideas and see if you can find the White win. As we pointed out above, there are some subtleties here that we discovered with computer analysis, so you may find this an explosive problem, but take a shot and then click on Read More to see the solution.![]()
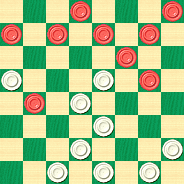
The Laboring Gardener

The gardener in the photo above is doing things the old-fashioned, laborious, long and hard way. Sometimes that's the only way to get the job done; in life and in checkers alike there isn't always a short-cut and there isn't always an "easy" way.
Today's lesson in our Checker School series is attributed to a Mr. W. Gardner (not "Gardener" although it's close enough for us). There are actually two solutions to the problem; there's the originally published solution, and an alternative. The alternative is long and tough, but the main solution is only a little less so. In short, this one has to be done the hard way, with much patience, effort, skill and perseverance. Here's the situation.
WHITE
BLACK
Black to Play and Win
B:WK16,13,K8,5:BK14,K7,2,1.
If you think this isn't an easy position to win, you're right, but it can be done. Stick with it, work at it, hoe away until the ground is cleared; then rake your mouse over Read More to see the original solution, a new solution, two sample games, detailed notes and a special sidebar about a checker-playing robot.![]()
The Checker Maven is produced at editorial offices in Honolulu, Hawai`i, as a completely non-commercial public service from which no profit is obtained or sought. Original material is Copyright © 2004-2025 Avi Gobbler Publishing. Other material is public domain, as attributed, or licensed under Creative Commons. Information presented on this site is offered as-is, at no cost, and bears no express or implied warranty as to accuracy or usability. You agree that you use such information entirely at your own risk. No liabilities of any kind under any legal theory whatsoever are accepted. The Checker Maven is dedicated to the memory of Mr. Bob Newell, Sr.