The Checker Maven
The World's Most Widely Read Checkers and Draughts Publication
Bob Newell, Editor-in-Chief
Published every Saturday morning in Honolulu, Hawai`i
Noticing missing images? An explanation is here.
Win One For Uncle Ben

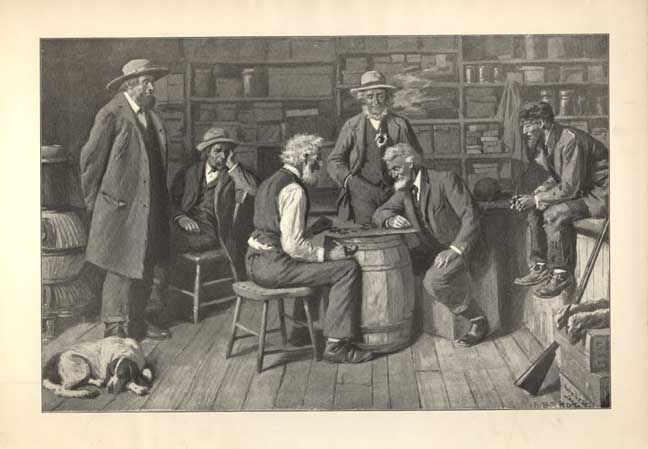
It was Saturday morning, the time of the week that Tommy would head over to Uncle Ben's porch for a checker lesson and some of Uncle Ben's famous lemonade.
But Tommy wouldn't be doing that today. Yesterday, Uncle Ben had been taken to Community Memorial Medical Center.

When Tommy heard the news, he was absolutely determined to pay his beloved checker mentor a visit at the hospital. There were just two problems with that. The biggest problem was that Tommy was still thirteen, and the minimum visiting age was fourteen. Second, Tommy's mother didn't exactly approve of him "bothering poor Uncle Ben while he's ill." Well, she didn't quite tell him he couldn't go ... and so, before she could actually utter those irrevocable words of prohibition, Tommy was on his bicycle, pedalling furiously downtown, making the trip in near-record time.

Tommy Wagner
The ward nurse, of course, asked Tommy about his age. Tommy was not one to tell lies, so he told the nurse that he was "almost fourteen" and kind of didn't say the word "almost" in quite as loud a voice as he said the word "fourteen." The nurse told him that she'd let him visit, but he'd have to keep it to ten minutes.
Uncle Ben was sitting up in his bed when Tommy went into his room. "Ah, what a nice surprise!" he exclaimed with a smile when he saw his young student. "I didn't expect to see you this morning! How ever did you get past the head nurse?" he asked, but then added, "Oh ... no matter. You're a resourceful checker player, after all."
"How are you doing, sir?" Tommy inquired.
"I'll be just fine, Tommy," Uncle Ben said, "I had a bit of a fall and they are just keeping me a little longer for observation. No real harm done. But I'm afraid we won't have any lemonade this morning."
"Oh, no, sir, I didn't come for a checker lesson. I just wanted to see how you were, and let you know that our school team has a big match this week against our rivals, Sunshine Middle, and I'll be playing second board!"
"Oh, you'd better practice up, then," replied Uncle Ben. "Second board --- I see Coach Hovmiller has moved you up rather quickly. You'll not have an easy game, but I'm sure you'll be ready." Uncle Ben turned to reach for something on his bedstand. "Here," he said, "I've got just the thing for you to try out."
Uncle Ben handed the object to Tommy; it was a sheet of paper with a hand-drawn diagram of a checker problem!
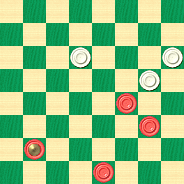
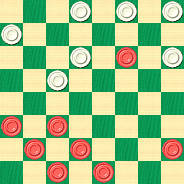
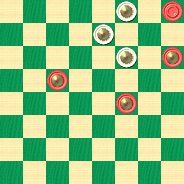
BLACK
Black to Play and Win
B:B2,9,14,K8:W21,23,17.
"Now, I know you didn't expect a lesson, nor will they let you stay here much longer, so how about you just take this problem home and practice with it?"
Tommy was all smiles. How could Uncle Ben have guessed that he would visit? But just at that moment, the ward nurse stuck her head through the door and said, "Time's up, young man!"
"Thank you, Uncle Ben," said Tommy as he turned to leave. "I'll surely study this problem carefully. And," he went on, "I'm going to win my game this week ... just for you!"
Now it was Uncle Ben who was all smiles. But the ward nurse had an insistent look. "Get well soon!" called Tommy as he left. "See you next week!"
Can you win one for Uncle Ben? He's counting on you! Solve the problem and then click on Read More to see the solution, a sample game, and no less than seventeen additional examples.![]()
The Twins, Bowen's, Of Course

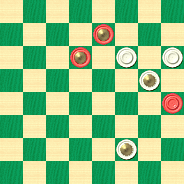
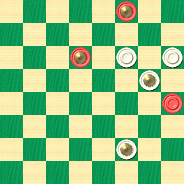
We don't know a whole lot, we confess, about old-time checkerist R. E. Bowen. To be specific, we're not sure if he ever had twins in his family, such as the twins shown above. We do know, though, that Mr. Bowen created twins, or more accurately, wrote about them; but they are decidedly twins of the checker variety, in the form of a "twin" position as shown in the first diagram below. In this situation, it all depends who plays first; but in the related positions shown in our second and third diagrams, Black will definitely win.
It's a classic lesson from the pages of our current Checker School textbook, Ben Boland's Famous Positions in the Game of Checkers. The lesson may be known to you, in name if not in detail, and this is your opportunity to learn just about everything about it.
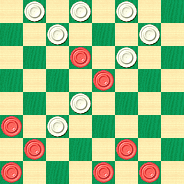
WHITE
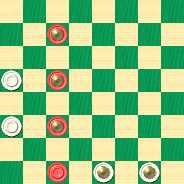
BLACK
Black Plays, White Draws
White Plays, Black Wins
B:W20,12,K2,K1:BK27,K19,K11,3.
W:W20,12,K2,K1:BK27,K19,K11,3.
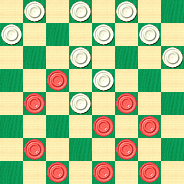
E. CLARK
WHITE
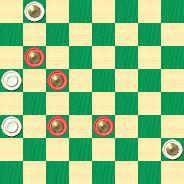
BLACK
Black to Play and Win
B:WK32,20,12,K5:BK24,K19,K11,K10.
D. KIRKWOOD
WHITE
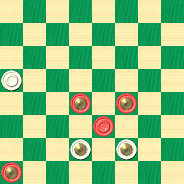
BLACK
Black to Play and Win
B:W20,K7,K6:BK15,K14,10,K4.
There are really four distinct problems here, so you might think of it as a pair of twins. Twins squared? We won't speculate further, but we do know that clicking on Read More will show you the solutions, sample games, detailed notes, and a surprise bonus feature.![]()
Fuller's Brushdown!
Who among us who is, shall we say, above a certain age, can fail to remember the Fuller Brush Man? Selling door-to-door, with his signature case of Fuller Brush Company wares--- they were sold with a unique lifetime guarantee--- he was a part of American culture, and was even immortalized in a Red Skelton movie in 1948. The Fuller Brush Man is perhaps no longer the icon he once was, but the company itself lives on, having relocated to Kansas in 1973.
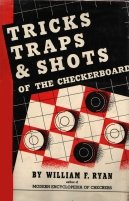
During Willie Ryan's days, the Fuller Brush Man was still a well-known figure, and hence it's no surprise that Willie makes a punning reference in his book Tricks Traps & Shots of the Checkerboard while describing a position attributed to checkerist Everett Fuller. But Willie can tell us about it much better than we can.
"Now and then, Everett Fuller of Milwaukee, Champion of Wisconsin, introduces a sparkling problem or an unusual game. Everett is the father of the following stroke, which, as strokes go, deserves a blue ribbon for its subtlety and bizarre character:
| 11-16 | 22-17 | 15-24 |
| 24-20 | 6-10 | 27-23 |
| 16-19 | 17-13 | 3- 8---4 |
| 23-16 | 8-11 | 23-18---5 |
| 12-19 | 26-22 | 8-12 |
| 22-18 | 14-18---1 | 30-26---6 |
| 9-14 | 21-17---2 | 12-16---7 |
| 18- 9 | 18-25 | 13- 9 |
| 5-14 | 29-22 | 4- 8 |
| 25-22 | 19-24---3 | 17-13. |
| 10-15 | 28-19 | See the |
| diagram." |
BLACK
Black to Play and Draw
B:W32,31,26,22,20,18,13,9:B24,16,11,10,8,7,2,1.
Notes by the Editor using KingsRow.
1---The computer gives Black a small edge here.
2---30-26 was better and now Black gets a significant lead.
3---Black should have played 4-8 to keep his advantage.
4---KingsRow prefers 24-28. After the text move the game is actually just a bit in White's favor.
5---13-9 was necessary to keep the White edge.
6---Just about loses. 13-9 was still best here.
7---The game continues to see-saw; 10-15 would have kept Black's superiority.
Can you solve this one, or will it give you the brush-off? In any case we offer a lifetime guarantee: clicking on Read More will always show you the solution.![]()
Principles of Strategy

Checkers is sometimes compared to a war game, with the players taking on the role of opposing Generals, commanding their respective forces of Red and White warriors. Fortunately, this analogy only goes so far; although checker combat can be sharp and demanding, it is happily of a peaceful, intellectual nature.
But much as war has its well-evolved principles of strategy, checkers too is a game of a highly strategic nature (though tactics often come to the fore). Checker strategy, however, is a topic that has generally not been well elaborated in checker literature. Literally only a handful of books have dealt in-depth with this facet of the game.
One of these books is Principles of Strategy in the Game of Checkers, the only published book by the late Brooklyn champion Louis Ginsberg. Dealing with the critically important Dyke positions, and published over 65 years ago, the book remains relevant and vital today with its insightful notes and clear elucidation of strategic principles.
This little book has long been out of print, but today we are releasing a newly-typeset electronic edition, which you can download at once here. We owe thanks to a mysterious "Mr. T." who provided us with carefully corrected interpreted scans of the original and helped greatly in moving the project forward. The book is available in PDF format and can easily be printed on plain letter paper if you prefer hard copy.
Let's take a quick peek at one of the positions in the book. It arises from the following play. Notes are taken from the book; notice the remarkable clarity and insight the author provides.
11-16---A 24-20 16-19---B 23x16 12x19 22-17---C 10-15---D 25-22---E 8-12---F 27-24---G 7-10---H 20-16---I 2-7---J 32-27---K 4-8 27-23 9-14---L 30-25---M 5-9---N; forms diagram
A---The Bristol opening which often assumes a "Dyke" formation.
B---Black takes command of 19 and expects to develop the "Dyke" if the opportunity offers.
C---A weak move, but generally made by the uninformed. Again the importance of 22-18 is noted, for if Black has visions of the center, the man on 18 must be removed by the 9-14 exchange (10-14, although sound, leads to a complicated formation of a different nature).
D---Black begins to mass his pieces as shown in previous examples.
E---White must try to establish his position and break up the coming "Dyke."
F---This move must eventually be made to support the piece on 19. If 7-10, trying to establish the formation too quickly, White goes 20-16 and spoils the "Dyke" as pointed out in Example 1.
G---The ever present defense in these formations, to be followed by 32-27, when the time comes, as explained before.
H---The text move is given to illustrate how a strong formation can be wrecked. It is proper to go 4-8 for if 32-27 comes next, 7-10 and the "Dyke" is very strong. If White tries 20-16 after 7-10 then 3-7 is the key move for the attack, eliminating the trunk game.
I---Threatening square 11, explained in Example 1.
J---Black gets ready to attack the piece on 16, having in mind 4-8 followed by 8-11. If White plays 16-11, 7-16, 24-20, then 3-8, 20-11, 19-23, etc.
K---White's destination is 18.
L---It is quite evident something must be done to stop the impending attack against the man on 15.
M---Threatening the three for two. This type of move in similar positions should always be considered as a threat against 18, a strategic point.
N---Nothing else to be done.
WHITE
White to Play and Win
W:W31,29,28,26,25,24,23,22,21,17,16:B19,15,14,12,10,9,8,7,6,3,1.
It's not as hard as it looks; can you break the Dyke or will the position hold water? It's up to you; solve the position and click on Read More to "leak" the solution.![]()
Basic Checkers Part Eight

Many of us believe that Jim Loy never sleeps, for this Bozeman, Montana-based Renaissance man is so prolific and turns out so much high-quality work that we can't believe there are enough hours in the day for him to get it all done. But he does, and though he's never revealed his secret, we're most happy and appreciative to benefit from his efforts.
What does Jim do? A visit to his website, jimloy.com, will tell you--- Jim does everything. From bowling to chess to tennis to billiards, there seems to be little that doesn't interest him, and he does nothing halfway. Fortunately for us, Jim takes a serious interest in checkers, too, and has lately been working on a series of projects aimed at restoring and correcting the classic works of the game.
Jim's checker books sell for a relatively nominal price on the American Checker Federation website. You'll find problem books, game books, and more; but today we want to focus on Jim's newest work, Basic Checkers Part 8: Corrections.
If you've read The Checker Maven for the past few months, you'll know that we recently participated in a reissue of Richard Fortman's seminal work, Basic Checkers. In our reissue, we reproduced the book with its original content; while we corrected obvious typos and other errors, we did not update or correct the actual game play. Mr. Loy's new book does exactly that; he provides us with just under a hundred pages of corrected or alternative lines of play. The book is the culmination of an effort Jim began in 2006, and gathers together work originally published in the ACF Bulletin as well as new work.
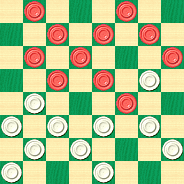
As an illustration, and also as this week's problem position, let's look at play in the 11-15, 22-17, 9-13 opening (taken from Part 8, page 57, note I).
11-15 22-17 9-13 17-14 10x17 21x14 8-11 23-19 15-18 19-15 4-8 24-19 6-10 15x6 1x17 25-21---A 17-22 26x17 13x22 27-23 18x27 32x23; forms diagram.
BLACK
Black to Play and win
B:W31,30,29,28,23,21,19:B22,12,11,8,7,5,3,2.
A---26-22 or 25-22 draw instead.
Black wins here in an unexpected and quite sophisticated manner. Finding the win may prove a difficult problem, but this one is good enough to merit considerable effort. So do try to work it out and then click on Read More for the solution and notes.![]()
21st Century Checkers

Today is a very special one as, thanks to the generosity of Grandmaster Richard Pask, we release an electronic version of 21st Century Checkers 9-13s, which is the first volume of an envisioned series of seven, covering all the accepted opening ballots. More than an extension or rework of Mr. Pask's earlier Solid Checkers (which will also be reissued by us in mid-2011), Mr. Pask has used the computer to take a fresh and comprehensive look at three-move play. The new book contains nearly 15,000 checker moves; consider that Richard Fortman's monumental Basic Checkers contains about 50,000 moves total in all seven parts, and you'll realize the enormous scope of Mr. Pask's new initiative.
The book can be downloaded here, and will eventually appear on our Richard Pask page, as linked in the right-hand column. If you wish to make a printed copy, be aware that the book makes extensive use of color and printing in black-and-white or grayscale may not be satisfactory.
Without a doubt this is a book you will want to have.
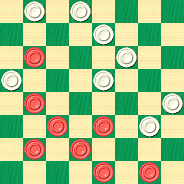
So, let's have a quick look! As an example of the book's content, and for this week's problem offering, here is a position that arises out of the 9-13 22-18 6-9 ballot.
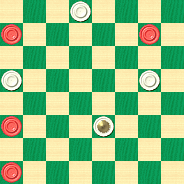
BLACK
Black to Play and Draw
B:W31,20,17,K10:B28,25,12,4.
Black's pieces are on the edge of the board and White has a king. How can Black save this one? "Book" your solution and then click on Read More to learn where to find the answer.![]()
Triple Threat
The term "Triple Threat" has a number of meanings, arising at least originally in the world of sports. The one we knew about was a football triple threat--- someone who can run, pass, and kick, as we recall. Apparently there is a triple threat position in basketball, with which we are wholly unfamiliar. And other uses abound, both in and out of sports, but with similar intent. Above, we have pictured a band called Triple Threat, who have played in the Boston, Massachusetts area. We imagine they base their band's name on the fact that there are three members. But when we tried to find out more, we soon discovered that numerous other bands around the United States are also called "Triple Threat."
Our checker school "Triple Threat" follows a similar pattern. We have three different checker positions, which have some similarities: Black has four pieces to White's three, and the formations are at least somewhat alike. But as we know, small differences are everything in checkers, and so in two of the positions White can draw but in the third, White is lost.
BLACK
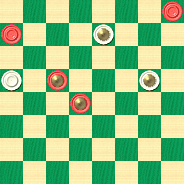
WHITE
White to Play and Draw
W:WK7,13,K16:B4,5,K14,K18.
BLACK

WHITE
White to Play and Draw
W:WK3,K11,K14:BK4,5,K23,K24.
BLACK
WHITE
Black to Play and Win, 2 Ways
Black shown at top for consistency
with other positions
B:WK3,K7,K11:B4,K12,K14,K19.
Are you yourself a "Triple Threat," which in this case means you can solve all three positions? Or are you a "Double Threat," a "Threat," or "No Threat At All"? Solve the problems, and we promise not to threaten anything if you click on Read More to reveal the solutions, a sample game, and detailed notes.![]()
Goldsboro's Guillotine
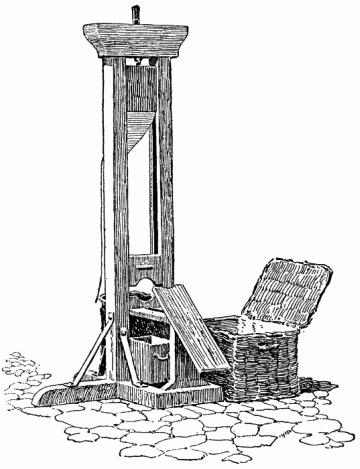
Off with their heads! Madame Guillotine was a very busy worker during the time of the French Revolution, and many a poor victim was lead out to encounter her deadly embrace. Fortunately, today's Checker Maven column uses this imagery in a much more peaceful manner, as Willie Ryan, in his book Tricks Traps & Shots of the Checkerboard, brings us a checker position which fits the metaphor to perfection. You'll see what we mean when you play through the game and solution. Willie is a bit brief about this one, perhaps because it does indeed speak for itself.
"Tailor Tom Goldsboro, one of England's foremost living players, does a nice job on this Dundee shot, which reveals a novel series of exchanges seldom seen in stroke tactics:
| 12-16 | 24-15 | 10-14 |
| 24-20 | 10-19 | 18-9 |
| 8-12 | 18-15 | 5-14 |
| 28-24 | 11-18 | 29-25 |
| 3-8 | 22-15 | 14-18 |
| 23-18 | 13-22 | 20-16---A, 1 |
| 9-13 | 25-18 | 19-23 |
| 21-17 | 7-10 | 16-11---2, which |
| 16-19 | 26-22 | leads to the |
| diagrammed | ||
| position. |
BLACK
Black to Play and Win
B:W32,31,30,27,25,22,15,11:B23,18,12,8,6,4,2,1.
A---Heading for a fall. The following sews up a draw without strain or pain: 30-26, 2-7, 22-17, 12-16, 20-2, 1-5, 2-9, 5-30, 27-23, 18-27, 32-16, 30-23, 15-10, drawn."
1---Play has been textbook perfect to this point, but one slip is all it takes in close and complex positions. The computer now rates the game as favorable for Black but not necessarily a forced win ---Ed.
2---Definitely loses. The computer gives 15-10 as having much better chances, though Black retains a good edge---Ed.
Can you slice and dice this position, or will your efforts be cut off? We certainly hope not, and dropping your mouse on Read More will lead you, not to the guillotine, but to the solution.![]()
Martins' Meatchopper

The antique, hand-operated meat chopper shown in the photo above looks rather wicked, and we'd advise you to keep your all of your fingers well clear when operating this particular instrument. In a somewhat similar manner, you'll need to watch your fingers as you move the pieces in today's installment from Willie Ryan's Tricks Traps & Shots of the Checkerboard. Willie calls it Martins' Meatchopper, and with good reason. Let's let him tell us more.
"Perhaps Robert Martins' chief claim to checker fame is premised on the fact that he was the favorite adversary of James Wyllie, and he played the role with ever-modest but tenacious propriety. These venerable old-timers played seven matches, totaling 388 games, with Martins winning one match, losing four, and drawing two. Here is a fine Martins masterpiece on the Bristol, which I learned when I was a boy.
| 11-16 | 27-23 | 9-14 |
| 24-20 | 11-16 | 29-25 |
| 16-19 | 20-11 | 5-9 |
| 23-16 | 7-16 | 22-18---A |
| 12-19 | 25-22 | forming the |
| 22-18 | 4-8 | diagram. |
| 8-11 | 18-15 |
WHITE
Black to Play and Win
B:W32,31,30,28,26,25,23,21,18,15:B19,16,14,10,9,8,6,3,2,1.
A---Loses, and leads to the stroke that follows. White can draw easily with: 31-27, 9-13, 22-18, 1-5, 18-9, 5-14, 27-24, 16-20, 23-16, 20-27, 32-23, 10-19, 16-12 (if 25-22 is played, the draw is attained with 8-12), 2-7, 23-16, 8-11, 25-22, 11-20, 26-23, 6-10, 22-18, 14-17, etc."
Can you operate the meat chopper without slicing your fingers in the process? Work it all out and then chop your mouse on the Read More button to see the solution.![]()
The Noble Vine

The noble vine and its delicious fruits! The sweet, ripe grapes are in their own right a delightful treat; and the wine that might be made from them can reach loftly heights of pleasure for the palate.
But don't indulge quite yet, for after all, we have our monthly Checker School session to attend first. It, too, is a product of the noble vine; or more precisely, turn of the century checkerists T. Noble and R. Vine. Today they bring us a pair of positions that look similar but in fact are as different as white wine and red wine.
| T. NOBLE | R. VINE |
| WHITE | WHITE |
 |  |
| BLACK | BLACK |
| Black to Play and Draw | White to Play and Win |
| B:W22,21,K17,K6:BK26,K23,13. | W:W22,21,K17,K6:BK30,K23,13. |
Black is a man down in both positions, yet he seems to have an advantage in mobility in both cases also. What's the difference? How can he manage to pull out a draw in the first one, but not in the second?
That's what's standing between you and (at least possibly) some sophisticated refreshments at the moment. Solve the problems, and then click on Read More to check the fruits of your labor against the published solutions. You'll also see two sample games, complete explanatory notes, and a very interesting "Advice for Beginners" article from a news column of yesteryear.![]()
The Checker Maven is produced at editorial offices in Honolulu, Hawai`i, as a completely non-commercial public service from which no profit is obtained or sought. Original material is Copyright © 2004-2025 Avi Gobbler Publishing. Other material is public domain, as attributed, or licensed under Creative Commons. Information presented on this site is offered as-is, at no cost, and bears no express or implied warranty as to accuracy or usability. You agree that you use such information entirely at your own risk. No liabilities of any kind under any legal theory whatsoever are accepted. The Checker Maven is dedicated to the memory of Mr. Bob Newell, Sr.