The Checker Maven
Jump to navigationLondon Bridge

Public Domain
One of Great Britain's most famous landmarks, London Bridge, has changed a lot over the years. The sketch above depicts London Bridge as it supposedly looked near the end of the 17th century. It's a far cry from today's London Bridge, and we suspect that's just as well.
One thing that hasn't changed over the years, though, is the Bridge Position in our game of checkers. Certainly, more variations and interesting problems have been published, but at heart a bridge has the same fundamental characteristics as ever.
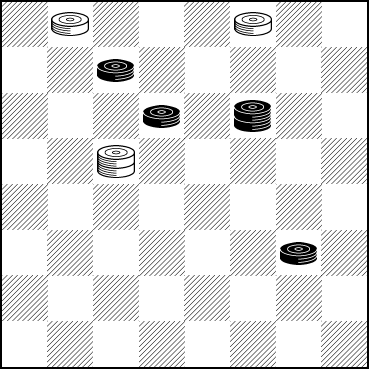
Of course, sometimes a bridge is a win, sometimes a loss, and oft-times a draw. It all depends. In the following position, a rather unornamented bridge turns out to be a loss for the bridging side.

BLACK
Black to Play and Win
B:W32,30,K19:B27,23,K22,9.
Is this a bridge that you can cross, by finding the Black win? We'd rate the difficulty as medium; if you're familiar with bridges, you won't have any trouble with it; and if you're not familiar with these positions, this is a good time to bridge that gap. When you're ready, click on Read More to see the solution.![]()
Solution
22-25 30x21---A 27-31 19x26 31x22 32-27 9-14---B 27-23 22-25---C 23-19 25-22 19-15 22-18 15-10---D 14-17 21x14 18x9---E 10-7 9-14 7-3 14-10 3-8 10-7 Black Wins.
A---The alternative jump leads to much the same play: 19x26 2. 27-31 30x21 3. 31x22 and now the solution follows the main line.
B---22-18 also wins here.
C---Not 22-18? 21-17 drawn. The text is an important waiting move.
D---15-11 no different.
E---Gaining the opposition and a clear win.
You can email the Webmaster with comments on this article.
